My No-Knead Bread Needs Some Work

I finally attempted Mark Bittman and Jim Lahey’s much touted No-Knead Bread Recipe. I used the 4 ingredients as instructed in the recipe (flour, instant yeast, salt and water), letting the dough rise untouched on my countertop for about 14 hours (instructions advised 12 – 18 hours). The dough was really more of a batter when I turned it out on the work surface and it was with great difficulty that I turned the “blob” into itself. It would have been impossible to knead, even if I had wanted to do so. I had to wash and flour my hands several times to move the blob around the work surface.  Despite the loose batter, it did have a great yeast-y bread aroma and I was optimistic. I dutifully followed the instructions, letting it sit for another 15 minutes, then wrapping it in a towel for another 1-2 hours. I checked out Breadtopia’s site and modified recipe, too. Breadtopia suggested 1 1/2 cups water vs. Bittman’s 1 5/8 cups (which is a hard to measure quantity, to boot). I think my dough/batter had too much liquid.

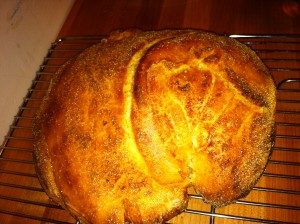
No-Knead Bread fresh from the Oven

After the final rising period, I turned my still blob-like dough into the heated Le Creuset dutch oven and placed in the oven for 30 minutes covered. As an aside, my dutch oven does not get enough use, so I am always excited to put it to work (along with my biceps when lifting it in and out of the oven!) When I removed the cover, I was excited to see a bread-like loaf had indeed formed. Maybe this was going to work out after all…

I let it cool on a wire rack for several hours and then placed it in a paper bag overnight. The bread did have an attractive crust and color, and definitely looked homemade. But the uneven height concerned me. Had my dough risen sufficiently? What is wrong with this picture, I wondered?

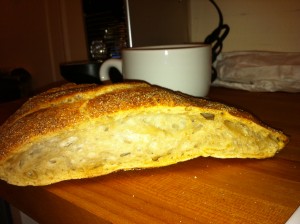
No-Knead Bread or Focaccia??

We tested the bread for breakfast yesterday morning. It took a little work to cut into the super crusty exterior, even with a sharp serrated bread knife. Points for a crisp crust, I thought. The interior was airy, too, but there just wasn’t enough of it. The 1 1/2 – 2 inch height was more like that of focaccia, than a traditional boule. We ate a few slices plain, untoasted, and the bread had good bite and flavor, but as Hubs aptly noted, the crust:bread ratio was off. Mind you, this bread was still infinitely edible, and there were no complaints from baby Sam. A decent first attempt, but definitely not a fool-proof recipe. I look forward to trying again.

Have you tried this bread recipe before?

Tuesday Night & What’s for Dinner? My Take on Pizzoccheri

The weather was turning nasty yet again, and I was feeling like something cozy and hearty for dinner. I was thinking about a pasta dish with some vitamins/vegetables. Pizzoccheri came to mind, which is a dish from the Valtellina in Northern Italy. It is a typical dish served in the mountains, usually during a day of skiing or outdoor labor. It is rich and tasty, made with buckwheat noodles, bitter greens (usually swiss chard), fontina, and sometimes potatoes. Perfect for a dinner for 2 after a day at the office, right? Anyway, the idea popped into my head and I couldn’t shake it.  I didn’t follow a recipe, but made one up as I went along, working off of memory and taste. Tracking down buckwheat noodles at the last minute, was not going to happen, so I used fresh whole wheat fettucine (store-bought), and for the greens, I chose organic kale (I reasoned that the power of the pasta would overcome Hubs’s revulsion to kale). I also bought some fontina to shred into the mix. 

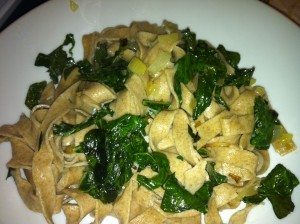
My Pizzoccheri Pasta

The end result was a tasty, gooey pasta dish that warmed the bones. Not quite the traditional recipe, but worth repeating for sure. For more details on the real pizzoccheri deal, you can also check out Mark Bittman’s NY Times article   here.

My Pizzoccheri-like Pasta

3 or 4 tablespoons olive oil
1/2 pound fresh whole wheat pasta, preferably fettucine, or other long flat noodle
1 bunch kale, washed, stems removed and shredded
1 onion, chopped
3 cloves garlic, peeled and sliced
Red pepper flakes (optional)
1/2 cup shredded fontina cheese
Kosher salt and fresh black pepper

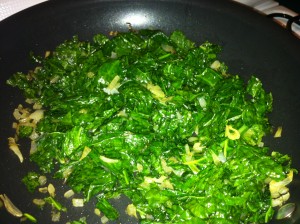
Sauteed kale, onion and garlic

In large pan, saute onion in about 2 tablespoons olive oil until softened. Add garlic and continue to saute. Do not brown. Add kale in handfuls and saute until wilted. Add additional 1-2 tablespoons olive oil if kale mixture appears dry. Season with salt and pepper, and red chili pepper flakes (if using). Once kale is wilted, set aside.

Bring large pot of water to boil and prepare pasta according to directions. Fresh pasta only takes 2-3 minutes to cook, so I do recommend preparing the kale mixture in advance, or at least while the water is coming to a boil. Once noodles are al dente, re-heat kale mixture on a low heat, and use slotted spoon to remove from boiling water and add directly to kale mixture. Pasta should have some water on it (no need to drain), that will help loosen up the kale mixture (which is your pasta sauce). Incorporate pasta with kale mixture for a minute or two, over low flame and sprinkle fontina cheese on top. Serve immediately in bowls with additional cheese for sprinkling. Enjoy!

Yield: 2 servings

Post DIY Stock, DIY Thanksgiving Stuffing??

What comes after making your own Vegetable Stock? Thanksgiving stuffing, or dressing as called by some, cannot be far behind. Thanksgiving is all about tradition, and we have always made stuffing from the Pepperidge Farm cubed bread in a bag. But as I am getting bolder in my DIY ways, I am tempted to veer off course and try my own hand. This article by Julia Moskin from the NY Times has me thinking….

At the end of the day, the Pepperidge Farm bagged variety is nothing more than seasoned bread. But it does have a strong track record and brand.

What’s your preference?

My Gift to You: Tropical Storm Sandy Seared Char & Hearty Lentils

Hello Readers,

It has been over a week since my last post and all is well. Thankfully, we managed fine during the storm, it has simply taken a few days to get fully operational. I bet you are wondering what to prepare when you’re waiting for a tropical storm to hit a non-tropical climate? One dish came to mind last week – a mix of hearty, healthy and homey – Seared Salmon with Lentils and Balsamic Reduction.

Last Monday (pre-Sandy) we ventured to the local market  to stock up. With limited supplies available, I picked up whatever looked fresh at the fish counter, assuming it would be a few days before we could even consider a luxury like freshly caught fish. The Arctic Char fillets looked juicy and firm, and with no fresh salmon in sight, that would be it. I decided to use the Char in place of salmon fillets for my tried and true hearty fall/winter recipe. This is a multi-step meal, so I’ll prepare the lentils in advance,  and let them rest on the stove top or in the fridge. The fish and balsamic vinegar sauce can be prepared in about 15 minutes when you are ready for dinner. Highly recommend this nutrient-dense, protein-rich meal. Extra lentils make for a great lunch next day. Hubs is a fan, too. Things were a bit hectic, so sorry, no photos for this post.

The preparation is loosely based on Sally Schneider’s recipe from A New Way to Cook, replacing the lentil preparation with Jamie Oliver’s from The Naked Chef cookbook. I have modified the original lentil recipe to be vegetarian. Trust me, best lentil recipe ever.

Seared Char with Lentils and Balsamic Reduction

For the lentils, which can be prepared in advance:

  • 1 cup Puy lentils, or green lentils
  • 1 tablespoon olive oil
  • 3 heaped tablespoons chopped fresh rosemary or 2 tablespoons dried rosemary
  • 1 red onion or 2 shallots finely chopped
  • 1 carrot, chopped (optional)
  • 2 cloves of garlic finely chopped
  • 2 1/2 cups vegetable stock
  • 2 tablespoons extra virgin olive oil
  • 1/2 tablespoon red wine vinegar
  • salt and freshly ground black pepper

For the salmon and balsamic reduction:

  • 1 cup balsamic vinegar
  • 1 tablespoon unsalted butter
  • 2 6-ounce arctic char fillets, skin on (or salmon!)
  • Dash cayenne pepper
  • Dash kosher salt
  • Fresh parsley, chopped (for garnish)


For the lentils: Give the lentils a quick wash. Using a thick bottomed, oven safe pan with a lid, heat 1 tablespoon of olive oil and add the rosemary, onion, and garlic. Cook for 2 minutes, then add carrot. Cook for a further 2 minutes then add the lentils and fry for about 1 minute. Add the stock, put the lid on and bring to the boil, then transfer to oven and simmer in the oven for 1 hour at 300F, or until tender stirring occasionally.  By this time a lot of the stock will have been absorbed.

Add 2 tablespoons of your best extra virgin olive oil 1/2 blespoon of red wine vinegar and black pepper and salt to taste. Set aside until ready to serve salmon.

For the balsamic sauce: In a small, non-reactive saucepan, bring the vinegar to a boil over moderate heat. Reduce the heat slightly and cook until reduced to 1/4 cup and thick and syrupy. Remove from heat and set aside

For the salmon: Place the salmon skin side up on a work surface and make several shallow slashes in the skin using a sharp paring knife (this will help prevent salmon from curling when it hits the hot pan). Sprinkle lightly with cayenne pepper and salt.

Heat a large, nonstick pan (cast iron pan works great, too) over moderate heat until very hot. Place salmon in pan, skin side down and to not move for 4-5 minutes (skin should be crisp and brown). Turn fillets over, and cook for another 2-3 minutes depending on how well cooked you like your salmon. Remove fillets from pan and let rest for 1-2 minutes while you prep the rest of the dish.

Return the balsamic sauce to the moderate heat and bring to a simmer. Add the butter and stir until blended.

If using parsley, stir into lentils. Mound lentils onto plate. Place 1 salmon filet on plate, then drizzle balsamic sauce around the lentils. Repeat and enjoy.

Yield: 2 servings, with extra lentils for the next day.