5 Thanksgiving “Wish List” Recipes

While our menu is pretty much set for Thanksgiving, I thought I would take a few minutes to share my 5 “Wish List” recipes – all original, homemade and perfect for Thanksgiving. These recipes intrigue me and are going in the file for this winter, or maybe a last minute switcher-ooo come Thursday…

The recipes all come from fellow foodie bloggers and members of the Village Green Network, so props to these great home cooks and writers.

Butternut Squash Gratin in Baby Pumpkins from OhLardy!

  1. Butternut Squash Gratin from OhLardy!. The most gorg presentation – serve squash in baby pumpkins! Picture at right courtesy of OhLardy!
  2. Pissota: An Old World Olive Oil Cake from Nourishing Joy. The author was inspired by her sister who lives in Spain, but the recipe is classic Italian (near and dear to my own heart)
  3. Pumpkin Pie Meringue Candy by Ditch the Wheat. I am a sucker for anything meringue.
  4. Roasted Sage Squash with Honey by  Whole Green Love. Roasting squash and root vegetables make for a healthy and tasty side dish, and I like the honey + sage combo.
  5. Crockpot Caramelized onions from Empowered Sustenence. Caramelized onions are so simple and delicious.
Please post a comment below if you try any of these dishes, or share your own Thanksgiving menu “Wish List” items.


Toss the Canned Cranberry – 4 Ingredients you MUST buy for Thanksgiving

We are T minus 1 week until Turkey Time. And while the turkey won’t pass these lips, all the sides and condiments do. One of my favorites is homemade Fresh Cranberry Relish. The relish is the most beautiful ruby color you’ve ever seen.  Put the 4 ingredients below on your shopping list and plan on making this a day or 2 in advance.  I promise you, you will never buy canned or fresh store bought (for $10!!) ever again if you try this recipe.

Fresh Cranberry Relish

Use Bonne Maman peach preserves and you won’t be sorry

  1. 1 package fresh cranberries
  2. 1/2 cup fresh-squeezed orange juice (squeeze your own, or buy freshly squeezed)
  3. zest of 1 navel orange
  4. 1/2 jar peach preserves (I like Bonne Maman)

Rinse cranberries. Place in a pot with the orange juice, zest and preserves. Simmer, just until cranberries pop open, stirring occasionally. Should take 20 – 25 minutes.

Cool and serve, or store.  Serve in glass bowl for maximum effect at the dining table. Can be prepared 1- 2 days before Thanksgiving.

We picked up this recipe several years from our local supermarket Guido’s, in Great Barrington, and have been hooked ever since.

Please comment on what condiments, cranberry or otherwise, you serve at Thanksgiving.

Verdict on Whole, Roasted Snapper: Easy weeknight meal

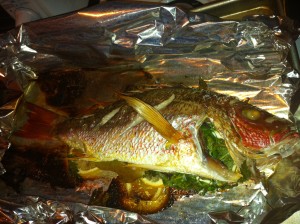
Ready to serve: Roasted Red Snapper

Well, folks, the Whole Roasted Snapper was indeed an easy weeknight meal. As long as you don’t count the minutes lost to anxiety, it took about 7 minutes prep time in total. I spent 5 minutes prepping the ingredients (slice lemons, smash garlic, wash herbs) and then dressing the fish (rub with olive oil and salt, stuff with lemon slices, herbs and garlic).  It took another 2 minutes to open the bottle of white wine, then pour a glass onto the fish and a glass for myself.  In fact, my little helper Sam even enjoyed assisting in the prep and documentation (hence the nickname “Nemo” for the snapper).

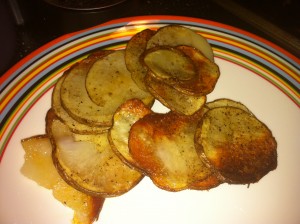
Gone in seconds: Crispy Baked “Potato Chips”

I removed the head and tails and main skeleton at the kitchen countertop, serving quasi-fillets for dinner. The fish was quite juicy and tender, and probably would have benefited from even a few minutes less in the oven. I will update my recipe accordingly. And needless to say, these crispy, baked, “potato chips” were also a hit. Clean plates all around.

Now, time to focus on Thanksgiving planning. We are T minus 1 week.

Thanksgiving prep – Menu and Tools

We usually have the menu sorted out by now, but running a little late this year. The exciting news is that our guest list has more than doubled in size. Sister-in-law Rebecca and family are joining for the festive day. Here’s what we have planned (so far):

NEW ADDITIONS: Parker House Rolls and Shrimp Cocktail with Homemade Cocktail Sauce

That’s it for now – I am sure I missed something. Will prepare shopping list by Friday and need to consider what additional pots, pans and equipment we’ll need to sort out, too.

In case you are wondering, I do not eat turkey, not even on Thanksgiving. And, trust me, I don’t go hungry.

Whole, Roasted Snapper: Easy weeknight meal or disaster in the making?

As much as I enjoy eating whole fish, I almost never make it at home. My few attempts have been on the grill during the summer (with Hubs’s grilling skills), which led me to the sentiment above: easy-peasy weeknight dinner, or disaster in the making?

Nemo

When I stopped by the fish counter this morning, I had every intention of buying white fish fillets, but nothing looked great or reasonably priced, and then the whole red snapper caught my eye. Why not? I’d roast it simply in the oven with some fresh herbs, lemon, garlic and olive oil. Easy, right? And to hedge my bets, I also picked up salad and a few russet potatoes to prepare as a side dish. If the fish elicits any moans, the crispy, roasted potatoes will neutralize them.

In my head, I had figured out the ingredients, but I did a little research to double check cooking temperature and times. I will loosely follow this recipe from Anne Burrell.

Whole Roasted Red Snapper

1 (2 pound) fish, such as snapper or bass, scaled, gutted and gills removed
Kosher salt
Extra-virgin olive oil
8 lemon slices
2 fresh bay leaves
1 bundle assorted fresh herbs, such as thyme, oregano, marjoram and parsley, plus some extra to lay the fish on while baking
4 cloves garlic, smashed
1 cups dry white wine

Preheat the oven to 400 degrees F.  Using a sharp paring knife, make 3 diagonal slices about 1/2-inch deep on each side of the fish. Salt and olive oil the fish generously.  Season the inside of the fish with salt and olive oil. Place 4 lemon slices, the bay leaves, a bundle of the mixed herbs and 2 of the garlic cloves inside the body cavity.

Ready for the oven: Red Snapper dressed with lemon, herbs, and garlic

Line a sheet tray with aluminum foil and arrange the remaining assorted herbs, lemon slices and garlic in the center of the tray and lay the fish on top.

Fold the aluminum foil up around the sides of the fish to create a sort of baking dish. Add the white wine and place in the preheated oven and roast until the fish is just cooked through, about 30 to 35 20-25 minutes.

Remove from oven, and allow to rest for 5 minutes. Fillet your fish tableside or at the kitchen counter. Drizzle fillets with olive oil and additional salt and pepper as needed. Happy Eating.

Will report out tomorrow: easy peasy or weeknight disaster. Stay tuned

My No-Knead Bread Needs Some Work

I finally attempted Mark Bittman and Jim Lahey’s much touted No-Knead Bread Recipe. I used the 4 ingredients as instructed in the recipe (flour, instant yeast, salt and water), letting the dough rise untouched on my countertop for about 14 hours (instructions advised 12 – 18 hours). The dough was really more of a batter when I turned it out on the work surface and it was with great difficulty that I turned the “blob” into itself. It would have been impossible to knead, even if I had wanted to do so. I had to wash and flour my hands several times to move the blob around the work surface.  Despite the loose batter, it did have a great yeast-y bread aroma and I was optimistic. I dutifully followed the instructions, letting it sit for another 15 minutes, then wrapping it in a towel for another 1-2 hours. I checked out Breadtopia’s site and modified recipe, too. Breadtopia suggested 1 1/2 cups water vs. Bittman’s 1 5/8 cups (which is a hard to measure quantity, to boot). I think my dough/batter had too much liquid.

No-Knead Bread fresh from the Oven

After the final rising period, I turned my still blob-like dough into the heated Le Creuset dutch oven and placed in the oven for 30 minutes covered. As an aside, my dutch oven does not get enough use, so I am always excited to put it to work (along with my biceps when lifting it in and out of the oven!) When I removed the cover, I was excited to see a bread-like loaf had indeed formed. Maybe this was going to work out after all…

I let it cool on a wire rack for several hours and then placed it in a paper bag overnight. The bread did have an attractive crust and color, and definitely looked homemade. But the uneven height concerned me. Had my dough risen sufficiently? What is wrong with this picture, I wondered?

No-Knead Bread or Focaccia??

We tested the bread for breakfast yesterday morning. It took a little work to cut into the super crusty exterior, even with a sharp serrated bread knife. Points for a crisp crust, I thought. The interior was airy, too, but there just wasn’t enough of it. The 1 1/2 – 2 inch height was more like that of focaccia, than a traditional boule. We ate a few slices plain, untoasted, and the bread had good bite and flavor, but as Hubs aptly noted, the crust:bread ratio was off. Mind you, this bread was still infinitely edible, and there were no complaints from baby Sam. A decent first attempt, but definitely not a fool-proof recipe. I look forward to trying again.

Have you tried this bread recipe before?

Tuesday Night & What’s for Dinner? My Take on Pizzoccheri

The weather was turning nasty yet again, and I was feeling like something cozy and hearty for dinner. I was thinking about a pasta dish with some vitamins/vegetables. Pizzoccheri came to mind, which is a dish from the Valtellina in Northern Italy. It is a typical dish served in the mountains, usually during a day of skiing or outdoor labor. It is rich and tasty, made with buckwheat noodles, bitter greens (usually swiss chard), fontina, and sometimes potatoes. Perfect for a dinner for 2 after a day at the office, right? Anyway, the idea popped into my head and I couldn’t shake it.  I didn’t follow a recipe, but made one up as I went along, working off of memory and taste. Tracking down buckwheat noodles at the last minute, was not going to happen, so I used fresh whole wheat fettucine (store-bought), and for the greens, I chose organic kale (I reasoned that the power of the pasta would overcome Hubs’s revulsion to kale). I also bought some fontina to shred into the mix. 

My Pizzoccheri Pasta

The end result was a tasty, gooey pasta dish that warmed the bones. Not quite the traditional recipe, but worth repeating for sure. For more details on the real pizzoccheri deal, you can also check out Mark Bittman’s NY Times article   here.

My Pizzoccheri-like Pasta

3 or 4 tablespoons olive oil
1/2 pound fresh whole wheat pasta, preferably fettucine, or other long flat noodle
1 bunch kale, washed, stems removed and shredded
1 onion, chopped
3 cloves garlic, peeled and sliced
Red pepper flakes (optional)
1/2 cup shredded fontina cheese
Kosher salt and fresh black pepper

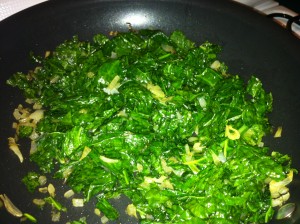
Sauteed kale, onion and garlic

In large pan, saute onion in about 2 tablespoons olive oil until softened. Add garlic and continue to saute. Do not brown. Add kale in handfuls and saute until wilted. Add additional 1-2 tablespoons olive oil if kale mixture appears dry. Season with salt and pepper, and red chili pepper flakes (if using). Once kale is wilted, set aside.

Bring large pot of water to boil and prepare pasta according to directions. Fresh pasta only takes 2-3 minutes to cook, so I do recommend preparing the kale mixture in advance, or at least while the water is coming to a boil. Once noodles are al dente, re-heat kale mixture on a low heat, and use slotted spoon to remove from boiling water and add directly to kale mixture. Pasta should have some water on it (no need to drain), that will help loosen up the kale mixture (which is your pasta sauce). Incorporate pasta with kale mixture for a minute or two, over low flame and sprinkle fontina cheese on top. Serve immediately in bowls with additional cheese for sprinkling. Enjoy!

Yield: 2 servings

Post DIY Stock, DIY Thanksgiving Stuffing??

What comes after making your own Vegetable Stock? Thanksgiving stuffing, or dressing as called by some, cannot be far behind. Thanksgiving is all about tradition, and we have always made stuffing from the Pepperidge Farm cubed bread in a bag. But as I am getting bolder in my DIY ways, I am tempted to veer off course and try my own hand. This article by Julia Moskin from the NY Times has me thinking….

At the end of the day, the Pepperidge Farm bagged variety is nothing more than seasoned bread. But it does have a strong track record and brand.

What’s your preference?

A Tale of Two Shrooms: Leek and Shiitake Mushroom Risotto & the Aftermath

Summary statement for this post: Make more than you need, it’s better on Day 2. I love making risotto, though it is strictly a weekend activity because it does take more than 30 minutes to prepare. But on a cool fall or winter night, it cannot be beat. I was excited to see leeks again in my last CSA pick-up, as well as 2 large shiitake mushrooms. I decided to prepare a Leek & Shiitake Mushroom Risotto dish – a twish on the traditional Mushroom Risotto. I would use leeks instead of a sauteed onion, and shiitake mushrooms in place of poricini (traditional ingredient in Italy). Sadly, mushrooms are on Hubs’s verboten food list, but I insisted on using just 1 in this recipe as mushrooms add tremendous depth and flavor AND authenticity.

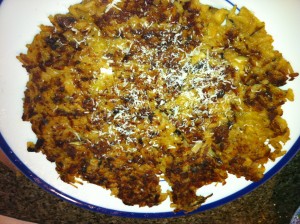
Best Leftovers: Risotto Al Salto

I also used my homemade Vegetable Stock, and a rind of parmiggiano. The  Risotto was yummy on Saturday night, very earthy and even had a brownish hue. Perhaps a little too shroom-y for Hubs’s taste, which is why we had a nice helping leftover. That’s the aftermath. I usually don’t have risotto leftovers, but was actually happy to have them on Sunday because I could make Risotto Al Salto. This is a classic Northern Italian dish using leftover rice, where you basically make a crispy pancake from your risotto. This photo does not do the dish justice. Hubs declared it much improved on Day 2. Um, what’s not to like?

Day 1: Mushroom & Leek Risotto 

1 cup arborio or cannaroli rice
3 tablespoons butter
2 leeks, cleaned and thinly sliced, white and light green parts only
3 cups vegetable stock, warmed
1 – 2 shiitake mushrooms, chopped
1/2 cup shredded parmiggiano
1 parmiggiano rind (optional)
Salt and pepper to taste

Saturday Night Risotto

In a medium, heavy-bottomed sauce pan, melt the butter and saute the leeks. Saute for ~10 minutes until softened, but not yet browned. Add the mushrooms. Saute for an additional 3-4 minutes until mushrooms are softened. Add rice. Stir and let toast for 1 – 2 minutes. Add 1 ladle (about ~1/2 cup) of broth at this time. Add a dash of kosher salt. Stir and let the risotto rest. It should bubble slowly. You want to let the rice absorb the stock, and there is no need to stir it constantly. Check in 2-4 minutes if the liquid has absorbed, and if so, add another ladle of stock. Repeat until risotto has reached desired consistency. It usually takes about 20 minutes or so of “bathing,” and you may have to adjust the stove setting. You can taste for doneness by biting into one grain of rice. It should still have some bite, but be cooked all the way through.

When risotto is cooked, stir in cheese gently. You can add an additional tablespoon of butter (optional), and add salt and pepper to taste. Sprinkle with a handful of shredded parmiggiano and enjoy.

Day 2: Mushroom & Leek Risotto Al Salto, or Risotto Pancake

Leftover risotto
1 tablespoon olive oil
Handful of shredded parmiggiano

Drizzle oil in medium saucepan and heat over medium heat. Spoon risotto into pan and spread out, like a pancake. Allow risotto to crisp, cooking for about 5 minutes. Flip using a spatula and crisp on other side. Slide onto plate and sprinkle with parmiggiano. Cut into quarters and serve. Enjoy!

And, for more details on making Risotto Al Salto, you can check out Giada de Laurentiis’s recipe.

3 Reasons to Make Homemade Vegetable Stock

Why bother to make your own stock from scratch? Easier to use it from the tetra-pak, aluminum can, or make it from a bouillon cube, right? I don’t disagree, and in a pinch, I will do the same.  And not to go all Martha Stewart on you, but I will give you my Top 3 Reasons for going the extra mile for this “pantry” staple:

  1. Flavah, flavah, flavah
  2. Ready to use when you need small quantities
  3. Savings

And if I had to give you only one reason, it would really be flavor. Using homemade stock in soups, risottos, and sauces has a dramatic impact on the taste of your final product. It adds depth and savoriness, and also a LOT less sodium than any pre-packaged variety. Also, store bought vegetable stock (for vegetarians and vegans) usually leaves something to be desired when it comes to flavor.

I will admit that it does require some advance planning and some effort on your part, but you will reap the benefits next time you make a pot of soup. Like any staple, when you make a batch of homemade stock, it is to put up. The recipe below (or any variation) freezes well. Once cool, pour broth carefully into ice cube trays, freeze, then pop out and store in Ziploc freezer bags (several per bag). The recipe makes an excellent base for all your vegetarian winter meals. I used about 1/3 of last week’s batch the same evening for my Leek & Shiitake Mushroom Risotto. Stay tuned for details.

I’ll spend a moment on Reasons #2 & #3 and stick with the soup example. If you aren’t making soup every night, you probably won’t go through an entire carton of stock. So, perfect to use 2 or 3 ice cubes of homemade Vegetable Stock that will be stored away in your freezer.  Since the flavor is super-concentrated, you can use about 1/2 the quantity needed and add water to dilute. As for savings (reason #3), I can guarantee that using up the past-their-prime veggies in your fridge and cupboard will cost less than purchasing cans or cartons of ready-made stock. If you are a planner, you can save vegetable peels in your freezer to use later for stock preparation. I admit that I have never had my act together enough to do this, but have thought about it.

DIY Vegetable Broth – Basic Recipe

2 tablespoons extra virgin olive oil
2 carrots, chopped
1 onion, chopped
1 celery stalk, chopped, include some leaves
5 -10 cloves garlic, roughly chopped
5 to 10 white mushrooms, halved or sliced (Optional)
Vegetable peelings or scraps (think green tops from leeks, potato peels, carrot peels)
10 to 20 parsley stems or stems with leaves
Kosher Salt
10 Whole pepper corns

1. Put the oil in a deep skillet or broad saucepan or casserole over medium high heat. When hot, add the carrots, onion, celery, and garlic. Cook without stirring for about 5 minutes, then stir once or twice and cook until the vegetables begin to brown. (If you have more time, brown them well, stirring only infrequently.)

2. Add the parsley, mushrooms (and any other vegetables), 8 cups water, and some pepper. Bring to a boil, then adjust the heat so the mixture simmers steadily but gently. Cook for at least 30 minutes until the vegetables are very tender, up to an hour if you have time. The soup will reduce, that’s ok.

3. Strain well, pushing down on softened vegetables to release the maximum amount of liquid, before using or storing. Allow to cool completely before freezing in ice cube trays. Can store in refrigerator for up to a week.

Chime in if you’ve ever made your own homemade stock and why – vegetarian or otherwise.